Step-by-step instructions on replacing the valve cover gasket on Mercedes Benz V6 and V8 engines found on the E Class, C Class, ML-Class, and many other models.
When the valve cover gasket leaks oil, it drips on the exhaust manifold. Once the engine warms up and the exhausts get hot, it will start to burn the oil, and the burned oil smell gets inside the driver’s cabin.

Replacing the valve cover gaskets is an easy job you can tackle.
Parts Needed
Tools Needed
- 3/8 Ratchet + extension
- 3/8 T Socket Torx Bit Set
- 3/8 E Socket Bit Set
- Screwdrivers
- Spark Plug Boot removal tool (Optional). It will make your job easier.
- 3/8 Torque Wrench that will do 8 Nm, 6 ft. lbs like this one.
Step by Step Instructions with Pictures
-
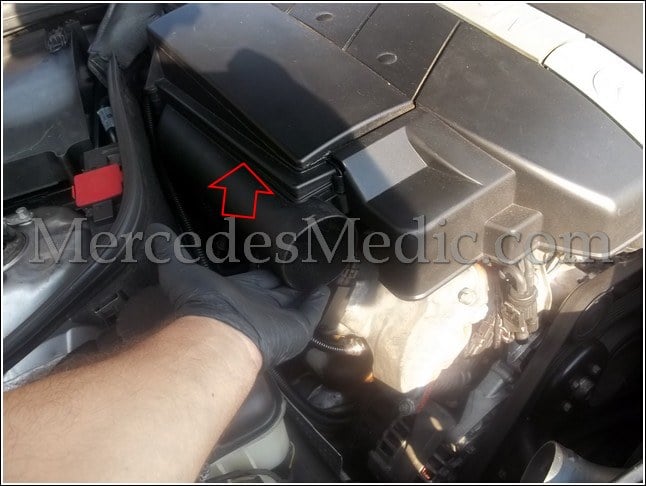
Remove the air ducts that go to the engine cover. Depending on your cover, you may have two air ducts or just one on some older covers. You pull the air ducts out towards the front of the car.

-
Remove the air ducts on the other side. Just pull it towards you.

-
Lift the cover-up on one side about a couple of inches, so it gets loose. Then lift the other side just a little bit.

-
Now grab the cover on both sides and lift it. It is not bolted down but held in place with a few clips.

-
Locate the passenger valve cover. You will notice a black plastic tube towards the back of the valve cover gasket. It is the crankcase breather hose. Remove it by pulling it away from the cover. Be careful not to damage it.

-
Remove the wires connected to the coil packs. Press on the little tabs and pull out. On the passenger side, you will have 3 plugs on the V6 engine or 4 for the V8.

-
Remove the Torx bolts that hold the coil packs in place. You will need to use T-30 Torx for these bolts.

- Pull the spark plug coils away to get to the bolts holding the valve cover gasket. If you want to make this job easy, you can remove the wires from the spark plugs, and you will have much more room. You will need a Mercedes Benz spark plug removal tool to do this. It is not necessary, but it will make your job easier. This is what we are talking about.

-
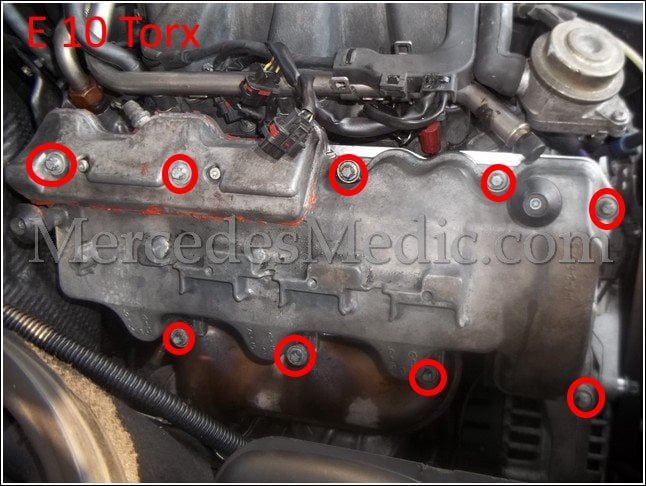
Use the E 10 Torx bit from your bit set to remove the bolts from the valve cover. Here are all the bolts that you will need to remove. Hint: If you can’t get an E 10 torx, you may get away with using an 8 mm socket on those bolts.


-
Remove the old valve cover gasket and clean the area where the gasket sits.

-
Carefully install the new valve cover gasket.

-
Place the valve cover with the new gasket back in place. Hand-tighten all the bolts by hand first.

-
Once you hand-tighten all the bolts, you will need a torque wrench to tighten the bolts. You need to tighten the bolts to 8 Nm or 70-inch pounds. That is not much force at all. Be careful not to over-tighten the bolts because that will cause the gasket to deform and thus leak again.

- Make sure to reconnect the coil packs and the coil pack wires. Also, don’t forget to reconnect the crankcase ventilation hose. Place the engine cover back on. It will snap back in place. Once that is done, you must connect the air ducts. We showed you how to fix the passenger side valve cover. The driver side is the same procedure. The passenger side is the one that normally causes the bad smell inside the cabin, though.
Videos Related to Valve Cover Replacement
Valve Cover Gasket Part Number
Manufacturer Part Number: 112 016 02 21 ; 112 016 03 21 1120160221 ; 1120160321 ; 112 016 0221
Applicable Models
2001-2005 Mercedes-Benz C240
1998-2000 Mercedes-Benz C280
2002-2004 Mercedes-Benz C32 AMG
2001-2005 Mercedes-Benz C320
1998-2005 Mercedes-Benz CLK320
1998-2004 Mercedes-Benz E320
2005 Mercedes-Benz E320 4Matic
2005 Mercedes-Benz E320 Base
1998-2003 Mercedes-Benz ML320
2003-2005 Mercedes-Benz ML350
2006 Mercedes-Benz S350
2002-2004 Mercedes-Benz SLK32 AMG
2001-2004 Mercedes-Benz SLK320


