AGW – Audio Gateway Control – N93/1
The Audio Gateway Control (AGW) in a Mercedes-Benz is critical to the vehicle’s audio system. It acts as the central control unit for the audio system and manages various functions, such as radio reception, CD and DVD playback, Bluetooth connectivity, and phone integration.
The AGW is responsible for processing the audio signals from various sources and distributing them to the appropriate speakers in the vehicle. It also controls the volume and equalization settings and provides inputs for the steering wheel controls and other interfaces.
If the AGW in a Mercedes-Benz becomes damaged or malfunctions, it can result in issues such as no sound, distorted sound, or the inability to connect to Bluetooth or other audio devices. In such cases, replacing the AGW can help restore the audio system’s functionality.
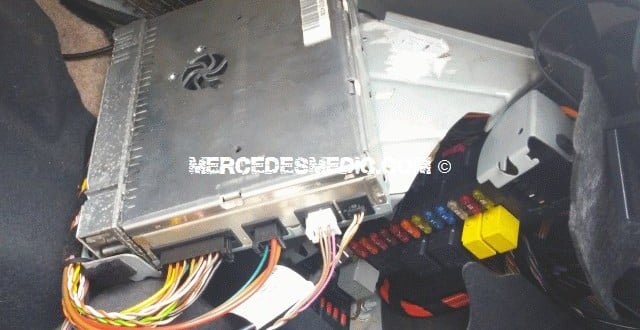
AGW stands for Audio Gateway Control unit N93/1. It is located on the left (driver) side inside the trunk.
Purpose of AGW (N93/1) Unit
What does the AGW unit do?
The AGW N93/1 is the brain of the audio system, the central audio interface within the MOST (media-oriented system transport). Control commands from different systems, such as the COMAND, radio control panel, or navigation unit, are transmitted via the MOST ring to the AGW N93/1.
Here is a list of tasks performed by this unit.
- Controls audio processing and signal received via the fiber optic ring.
- Receives and processes the AM/AF signals.
- Processes RDS signals. RDS stands for Radio Data System. It is data transmitted alongside audio and may include station name, artist info, and song name.
- Stores MOST central diagnostic settings.
- Serves as the Audio Amplifier for the loudspeaker.
- Sound processing and amplifying.
Remove / Install Audio Gateway Control Unit N93/1
Step 1: Locate AGW N93/1 Unit
The Audio Gateway Control Unit N93/1 is located in the trunk on the driver’s side.

Step 2: Remove the liner
Remove the liner to access the AGW unit. The liner is held in place with several plastic fasteners.

Step 3: Location of Audio Gateway Control Unit N93/1
Locate the audio gateway control unit N93/1.

Step 4: Remove 10 mm nut
There is one bolt that holds the AGW in place. It is right underneath the AGW unit and isn’t easy to see. You will need a deep 10 mm socket to remove the nut.

Step 5: Drill out two rivets
Using a cordless drill and metal drill bit, drill out the two rivets.

Step 5: Pull out AGW Unit
Pull out the AGW N93/1 unit. Be careful not to bend the fiber-optic cables too much or kink the cable.

Step 6: Remove AGW from the bracket
Remove the three nuts that hold the audio gateway control unit tied to the metal bracket.

Step 6: Install new unit
Install the new unit in reverse order. You will need a hand rivet gun. Any of these Best Seller Rivet Guns will get the job done.
AGW Audio Gate Way Control Unit N93/1 Part Number
W211 E Class E500 E55 E320 Becker Audio Amp Amplifier
- 2118272142 2003-2006
- 2118701889
- A211 827 43 42
- 211 827 4642 MY 2007+
- A2118206089 21011070
- A 211 545 8740 Bracket Part Number
R230 SL-Class Audio Gateway Amplifier AGW Amp
- 2208701889 R230 SL55 SL500
Related articles to the AGW N93/1:
- Audio Gateway removal and replace
- Audio Gate Way (AGW) in a E500 no tele, no nav, no map
- Battery Drain Mystery -Audio Gateway doesn’t want to sleep, seriously.
Reset AGW Audio Gateway N93/1 by pulling fuses.
Resetting the AGW unit by pulling the fuses will often resolve no-sound or head unit problems. To reset the AGW/Headunit, remove these fuses.
Headunit
Interior fuse box, fuse 28 (15A)
Remove fuse 28 and leave it disconnected for about 30 minutes.
Audi Gateway (AGW)
Rear SAM, fuse 6 (40A)
AGW reset, pull the fuse 6 and leave it disconnected for several min.
If resets do not work, you need to update the AGW software, which requires the use of Mercedes-Benz Star Diagnostic scanner. [/vc_column_text][/vc_column][/vc_row]


